ClearLight Closes Lab Services and Offers Expert Consulting Services Learn More

Tissue Clearing Comparison

Compare Clearing Methods

A comparison of tissue clearing protocols

Comparing Tissue Clearing Methods

It can be daunting to wade through the multitude of tissue clearing methods available. There are seemingly endless tissue clearing methods to consider, e.g., CLARITY, SeeDB, FRUIT, BABB, CUBIC, iDISCO, Visikol® HISTO™ and so on. A thorough tissue clearing comparison necessitates revisiting the basics of why we clear tissues in the first place.

Revisiting Tissue Clearing

Most tissues are opaque and don’t pass through light necessary for microscopy. We use tissue clearing techniques to render opaque tissues transparent. Once tissues are transparent they can be immunostained and imaged under a microscope for closer examination and to gain insights about their subcellular structure.

Simplistically, all techniques begin with fixed tissues; however, variation begins in the sample processing stage. CLARITY is the only technique to employ tissue lipid-clearing prior to immunostaining followed by refractive index (RI) matching. Most of the other techniques immunostain the tissue before applying the clearing reagent(s) which also serves as a refractive index match.

As scientists and experts in CLARITY tissue clearing, we at ClearLight have found that the work flow matters: clear - stain - image. You want to clear your tissue first, before you do the immunostaining and then you do the refractive index (RI) match for imaging. This prescribed order of operations produces superior results as this tissue clearing comparison reveals.

Critical Comparison of Tissue Clearing Methods

Of the four methods we focus on in our tissue clearing comparison, CLARITY, CUBIC, iDISCO, and Visikol® HISTO™, the latter three do not follow the order, clear-stain-image. Each performs immunostaining first and then uses organic solvent tissue clearing and RI matching. This may render a tissue “clear” but does it actually preserve the antigen and receptors for the given targets of interest in the tissue? In this tissue clearing comparison we’ll take a closer look at the morphology on a macroscopic level and show you how they compare. To do this, we’ll take a deep dive into the immunostaining quality of each clearing technique. To get started we first clear samples using each of the four methods.

CLARITY Tissue clearing Immunostaining RI match
CUBIC Immunostaining Tissue clearing / RI match
iDISCO Immunostaining Tissue clearing / RI match
Visikol® HISTO™ Immunostaining Tissue clearing / RI match

More about CLARITY

Human Lung Carcinoma: CLARITY Tissue Cleared - Immunostained - Imaged - DAPI (blue), pan-cadherin (green), CD8 (yellow), α-SMA (red)

CLARITY Tissue Clearing Overview

Free Download

CLARITY Tissue Clearing Infographic

CLARITY Tissue Clearing Infographic

CLARITY

iDISCO

CUBIC

Visikol

Tissue Clearing Comparison 1:

Cleared and RI Matched Sample Comparison (Mouse Kidney)

This is the same mouse kidney tissue that has been cleared using each tissue clearing protocol. All samples have been RI matched and are ready to be imaged.

At first glance all four tissues appear to be optically clear. Upon closer examination, only the CLARITY processed sample has maintained its original thickness. The CUBIC sample appears slightly hazy, and although the iDISCO and Visikol® HISTO™ samples appear very clear to the naked eye, they also look more handled and slightly degraded.

CLARITY

iDISCO

CUBIC

Visikol

Tissue Clearing Comparison 2:

Cleared and RI Matched Sample Comparison (MCF7 Xenograft)

The same four tissue clearing methods were used on another tissue type, an MCF7 xenograft. Again, the CUBIC processed sample doesn’t look quite clear. CLARITY seems robust, and clearer than what we see with the kidney. This may be due to the lack of vascularization and structure, which tends to be highlighted and more consistent in a kidney. The iDISCO and Visikol processed samples look very clear but slightly damaged and thinner around the edges. The samples do not look as robust compared to the CLARITY processed sample.

Each of these samples appear similar to the naked eye. Next, we image these tissues using a confocal microscope.

Did you know?
DAPI is commonly used as a nuclear counterstain in fluorescence microscopy.  Its blue fluorescence stands out in vivid contrast to the red, green, and yellow fluorescent probes of other antibodies.

Immunostained Image Comparison

Mouse Kidney - Alpha Smooth Muscle Actin (α-SMA)

ClearLight - 3D ‘XY’ View

ClearLight - 3D ‘XZ’ View

ClearLight - 2D Flat View

CLARITY Processed Mouse Kidney - (α-SMA)

We immunostained a mouse kidney with alpha smooth muscle actin (a-SMA). You can clearly see the vasculature that’s present using the CLARITY technique along with the branching that occurs throughout the kidney sample. The signal is strong. If we rotate the view from the standard XY view into the XZ view you can still maintain the main branch along with minor branches that are occurring. This is not apparent when only viewing in two dimensions.


CUBIC - 3D ‘XY’ View

CUBIC - 3D ‘XZ’ View

CUBIC - 2D Flat View

CUBIC Processed Mouse Kidney - (α-SMA)

For CUBIC the z-stack depth has been reduced due to lack of penetration, you see some branching but it's not as apparent. We are not able to see as deeply with the CUBIC sample; the signal is non-uniform and weak.


iDISCO - 3D ‘XY’ View

iDISCO - 3D ‘XZ’ View

iDISCO - 2D Flat View

Visikol® HISTO™ - 3D ‘XY’ View

Visikol® HISTO™ - 3D ‘XZ’ View

Visikol® HISTO™ - 2D Flat View

iDISCO and Visikol® HISTO™ Processed Mouse Kidney - (α-SMA)

With iDISCO and VISIKOL there is branching that can be seen. The depth of the z-stack is reduced compared to CLARITY. With a 2D slice view, this can be overlooked or may be easily missed. It is in the 3D rendering that we’re able to truly see a distinctive difference. This is important for tissue clearing. The primary goal is to allow and to capture a 3D rendering with cleared tissue.


Immunostained Image Comparison Mouse Kidney – (PAX8)

ClearLight - 3D ‘XY’ View

ClearLight - 3D ‘XZ’ View

ClearLight - 2D Flat View

CUBIC - 3D ‘XY’ View

CUBIC - 3D ‘XZ’ View

CUBIC - 2D Flat View

iDISCO - 3D ‘XY’ View

iDISCO - 3D ‘XZ’ View

iDISCO - 2D Flat View

Visikol® HISTO™ - 3D ‘XY’ View

Visikol® HISTO™ - 3D ‘XZ’ View

Visikol® HISTO™ - 2D Flat View

A different marker in the mouse kidney, paired-box 8 (PAX8), reveals additional differences. For CUBIC, a PAX8 signal is seen. However, there is a reduction in the DAPI signal.

iDISCO and Visikol® HISTO™ samples appear to have an overall reduction in the PAX8 signal while the DAPI signal is strong. Contrast that with the CLARITY processed sample where there is a clear and uniform signal for both biomarkers. With CLARITY we have a robust PAX8 and DAPI signal that is occuring for a solid z-stack depth that is also maintained in the 2D slice view.

With CUBIC, iDISCO, and Visikol® HISTO™ you're having to make trade-offs. Maybe you see PAX8 although the signal doesn’t appear as clean or as sharp or you see DAPI but you don’t see PAX8. Possibly you are essentially trading off biomarker expression with these other techniques.

Why should you have to pick between a nuclear
counterstain and your target of interest?

Immunostained Image Comparison MCF-7 Mouse Xenograft – Pan-Cytokeratin (Pan-CK)

ClearLight - 3D ‘XY’ View

ClearLight - 3D ‘XZ’ View

ClearLight - 2D Flat View

CUBIC - 3D ‘XY’ View

CUBIC - 3D ‘XZ’ View

CUBIC - 2D Flat View

iDISCO - 3D ‘XY’ View

iDISCO - 3D ‘XZ’ View

iDISCO - 2D Flat View

Visikol® HISTO™ - 3D ‘XY’ View

Visikol® HISTO™ - 3D ‘XZ’ View

Visikol® HISTO™ - 2D Flat View

This mouse xenograft was immunostained using pan-cytokeratin (pan-CK). With CLARITY, we maintained a strong pan-CK signal along with DAPI signaling. This is very apparent in the 2D slice view.

With CUBIC there is a decent pan-CK signal but it doesn’t look as clean or as bright. We are still observing a reduced DAPI signal with CUBIC.

With iDISCO and Visikol® HISTO™ what we find is surface staining. The pan-CK is not fully penetrating the tissue. You do maintain some DAPI signal although in the 2D slice what you don’t see are clear nuclei. This represents a trade-off between what you want to see. Researchers should be able to see their nuclear counterstain and their target of interest together. The contrast helps confirm that you are actually seeing a true signal.

See More Biology

ClearLight is an expert in thick tissue antibody penetration. Improving the penetration rate of antibodies into thick tissues increases our ability to visualize cellular and subcellular structure. This MCF-7 mouse xenograft exploration reveals that ClearLight can achieve high signal-to-noise ratios enabling researchers to see more biology.


Immunostained Image Comparison MCF-7 Mouse Xenograft – (Ki67)

ClearLight - 3D ‘XY’ View

ClearLight - 3D ‘XZ’ View

ClearLight - 2D Flat View

CUBIC - 3D ‘XY’ View

CUBIC - 3D ‘XZ’ View

CUBIC - 2D Flat View

iDISCO - 3D ‘XY’ View

iDISCO - 3D ‘XZ’ View

iDISCO - 2D Flat View

Visikol® HISTO™ - 3D ‘XY’ View

Visikol® HISTO™ - 3D ‘XZ’ View

Visikol® HISTO™ - 2D Flat View

This MCF-7 mouse xenograft was immunostained using Ki67. With CLARITY we see uniform penetration and staining with Ki67 throughout. In the 2D slice view we also have clear and identifiable DAPI staining to coincide with the Ki67.

In CUBIC we’re getting what appears to be non-uniform inconsistent staining that is also a bit off target with background staining. The same is true with iDISCO and Visikol® HISTO™. In addition, with iDISCO and Visikol there appears to be some epitope damage that is occurring so we’re not getting uniform staining for DAPI or for Ki67.

The CLARITY processed samples in this tissue clearing comparison were Mouse species. You might also be interested in this study where we determined the feasibility of a CLARITY tissue-processing approach to analyze biopsies from breast cancer patients. It was awarded Top 100 downloaded cancer papers on Scientific Reports.

Tissue Clearing Comparison Conclusion

A Stellar Parallel

By NASA and the European Space Agency. Edited by Noodle snacks - Source

All of the world’s best telescopes showed a dark and uninteresting region of space near the handle of the big dipper. On Christmas 1995, the Hubble Deep Field telescope looked into this region for 10 hours and discovered that the area was filled with thousands of galaxies previously unseen. Likewise, the best tissue clearing protocol should illuminate the microscopic realm and reveal myriad details. This is why we say ClearLight empowers researchers to "See More Biology."

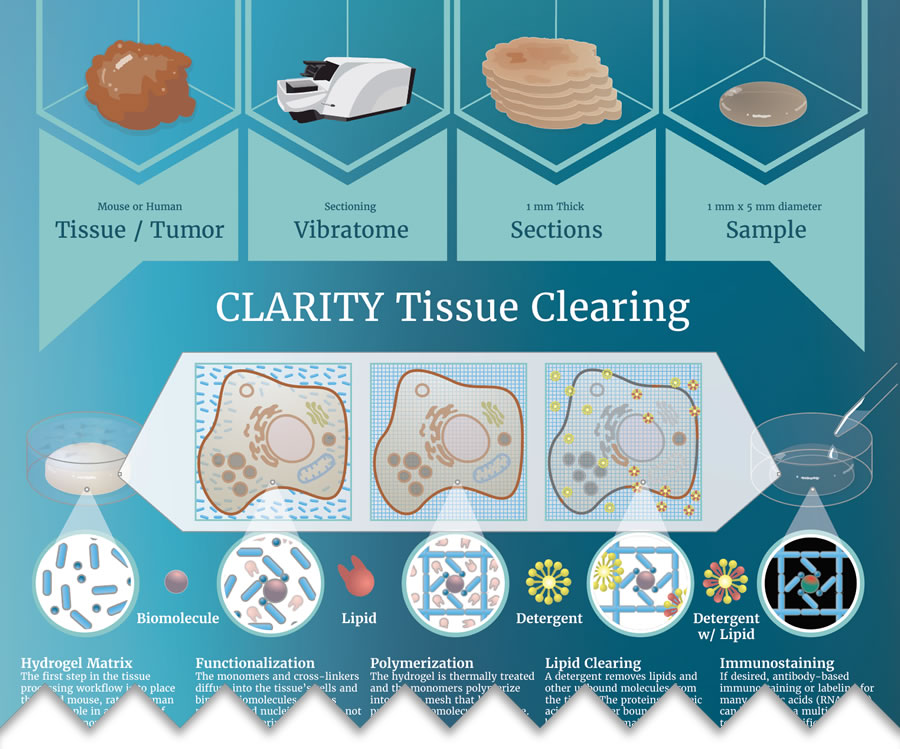
CLARITY is the preferred technique for retaining and evaluation of tissue quality, macro- and microscopically.

In this study we systematically evaluated CLARITY alongside CUBIC, iDISCO, and Visikol® HISTO™ clearing protocols. The prepared tissues were derived from the same tissue sample. Differences emerged even before imaging. The CLARITY prepared tissue maintained its structural integrity while other protocols produced what appeared to be degraded tissue samples. All samples appeared clear to the naked eye.

Seeing Beyond the Tissue Surface

For a true tissue clearing comparison it was necessary to evaluate the immunostaining quality of each clearing technique. A DAPI nuclear counterstain was applied to contrast against antibody staining using a-SMA, PAX8, pan-CK, and Ki67. Imaging under the confocal microscope revealed the CLARITY prepared samples showed greater antibody penetration, more consistent staining throughout, and a significantly brighter and clearer signal in the 3D "XY' and "XZ" views and again in the 2D slice views.

Biomarkers of Interest

Researchers should not have to make concessions while exploring the tissue microenvironment. You should be able to see both your biomarker(s) of interest and your contrasting DAPI nuclear counterstain.

Vasculature that was unseen by other tissue clearing methodology is prominently revealed using CLARITY and 3D IHC. If researchers are serious about seeing more biology they should strongly consider the CLARITY method. We reiterate that the order of clearing-staining-imaging matters. While the CLARITY protocol is published for any lab to perform on its own, to achieve the best results for clearing, antibody penetration, and imaging we encourage researchers to leverage our expertise and intellectual property at ClearLight Biotechnologies.
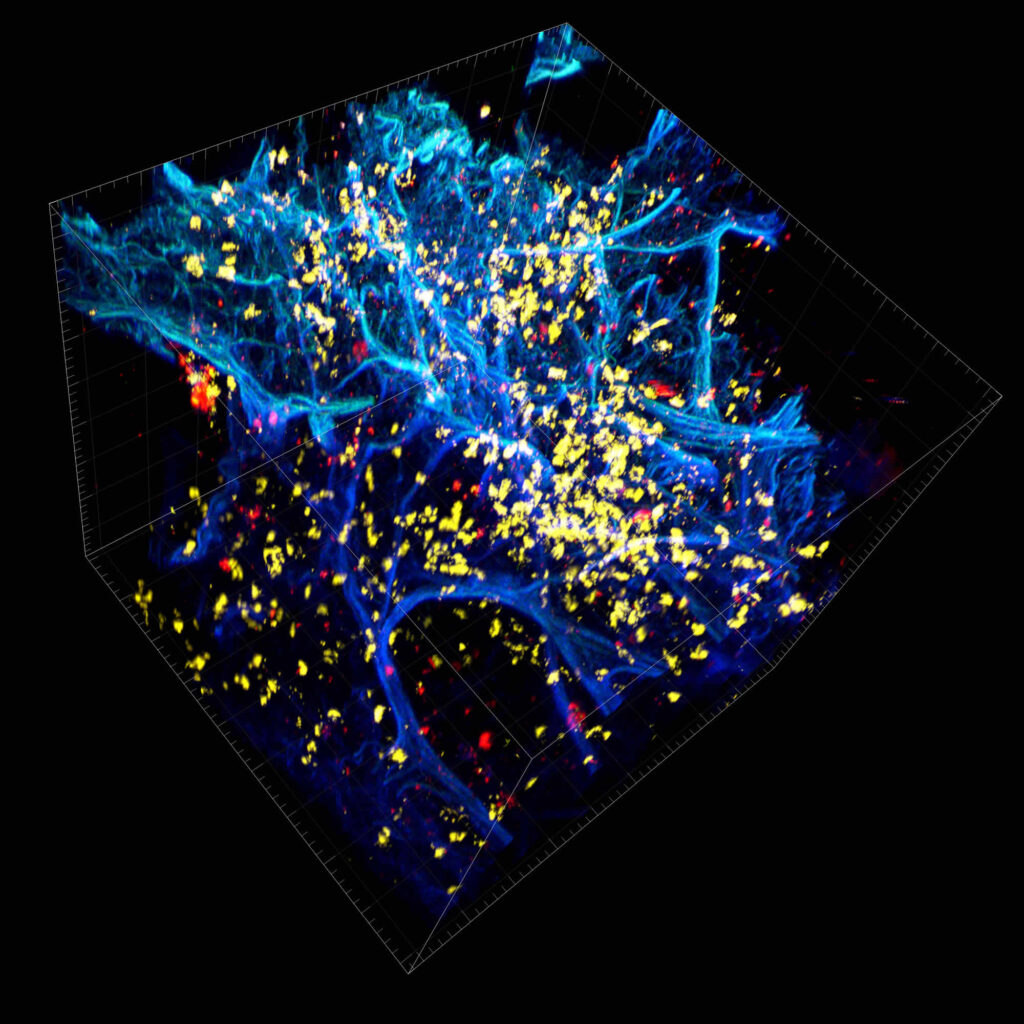
Note: Visikol® HISTO™ is a registered trademark of Visikol.


Learn More About Our Services and Capabilities

CLARITY Tissue Clearing and Tru3D™ Services

ClearLight Biotechnologies lab services include tissue clearing using the CLARITY method, 3D immunostaining, 3D imaging (multiplexed fluorescence), and Tru3D tissue analysis in 3D.

Services

CLARITY Tissue Clearing Primer

Need to know more about CLARITY Tissue Clearing? Visit the CLARITY tissue clearing page to learn the background and specific steps in the ClearLight CLARITY Tissue Clearing Process.

CLARITY

Contract Research and Development

Bring us your burning question and we'll apply our expertise and provide perspective. Together we'll explore further. With our help your team will See More Biology.

Contract R & D

Analysis can be performed for select biomarkers, please contact us to find out if your target of interest is one of them. Imaging is currently performed on select fields of view instead of the entire sample.

Submission Guidelines

Tissue Sample Requirements: